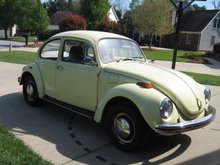
I purchased my seat upholstery first, because I really don't know what I'm doing and didn't realize how much other repair had to be done first. However, I finally got to start doing the seats today.
Shout out to my brother-in-law who brought over a work table this morning so I would have a good surface to work on.
I had blue vinyl seat covers that were in really bad shape, with black snap on covers that were also in really bad shape. I dutifully watched my "how to" video several times before I started. It certainly seemed easy enough. Remove the old upholstery, clean up the horsehair (yes, horsehair for the padding), bend up the spikes, apply new upholstery. It only took 15 minutes on the video. Not as easy in real life.
The first time I asked my husband for help was just taking the seat apart. The back is bolted to the bottom. The back frame slips over the two bolts. A normal female cannot pry the frame off of the bolts, so request number one for help. He took the seat apart, making me feel feeble, but grateful.
Next step was to strip the old upholstery and padding off of the bottom. The spikes do not just "bend up" like in the video. I had to get a flat head screwdriver to pry them up enough to get the needle nose pliers underneath to then bend them up. Three bandaids later, I had the seat bottom  done. By the way, request for help number two from my husband was a band-aid on the skin between my thumb and index finger.
The horsehair is another adventure. The pad itself peels off fairly easily, but the stuff goes everywhere. And it is very strange but there were quite a few acorn shells that kept appearing in the mess. I don't know if it was a messy previous owner, or part of the seat padding. The shop vac got a lot of use during the cleanup phase.
I removed the upholstery and padding, and was left with a fairly good frame, with a lot of junk stuck in and around the springs. I used a bottle brush, scrub brush, and sponge to get as much  as possible off the springs. In short order I was ready to start the upholstery process.
The process starts with a layer of burlap that is installed over the top of the springs to protect the foam and fabric from the springs. It is installed using hog-rings, little metal clips attached to the springs using a special set of pliers. Sounds hard, but it was probably the easiest thing I did all day.
 After the burlap is attached, you apply foam. I purchased a foam set, but in addition I needed a section of 1" foam to put on top of the burlap, under the formed foam pad. Off to Wal-Mart, where I found a nice 1" foam package for $13.
 I cut a section of foam to fit the top of the seat, and applied to the burlap with spray glue. The I added some additional spray glue on top and applied the foam pad. So far so good, I was ready to put on the upholstery.
 The cut and sew upholstery came from TMI, via jbugs.com. I pulled the fabric over my foamed seat frame. I pulled, and pulled, and pulled. I have tweed seat covers, so they do not stretch like the vinyl in the video. The goal was to pull the front and back edges down over the bottom of the frame, and hook them onto the metal spikes on the bottom. I could get close, but finally I gave up and made my third request for help from my husband. He kindly came out and helped push down the springs so I could hook the fabric over the spikes. Another bandaid later, we had the seat upholstery done on the seat bottom.
I was feeling pretty good because the seat bottom looked very good. So I tackled the back rest. I went through the same fabric removal, cleaning, burlap and foam process. Unfortunately, when I pulled the fabric up and off of the spikes, one broke off. So I sent a call for help to the Yahoo message board, and asked my brother-in-law if we could weld the tiny spike back on. Welding was not an option. Thinking back to my trusty video, I remember some fabric is just held on with hog-rings. Looking at the seat back I figured maybe I could just hog ring it to the frame. So I continued.
 When I tried to put the upholstery on the seat, it would not go on. Remembering a tip from the video, I pulled out an old dry cleaning bag and covered the foam with the plastic. The upholstery slipped right on. I called my husband out for a fourth time, and we proceeded to hook the fabric over the remaining spikes. That's when the second of the three spikes broke off, so now I only had the center spike. I tried using the hog rings to hook the sides to the frame, but it didn't do as well as I had hoped.
 I guess I hadn't been to Lowe's yet this weekend, so it was about time. A very helpful woman walked through the store for a half hour helping me look at various options for attaching the seat upholstery. I don't think I ever gave her a good mental picture of how it worked, because she showed me lawn spikes and other non-workable options. Finally, we found the cotter pins. Simple, and only cost $0.60 for a whole pack. So I took my cotter pins and headed home.
I slipped a cotter pin upwards onto the frame, forced the ends through the fabric, and hammered the ends down. Perfect! My seat back is done! I will need my husband's help to put the back and bottom together, but we can do that later. I didn't want to waste my help time because I knew I still had the backrest for the rear seat to do.
 I had stripped the rear seat back rest while I was pondering the broken spike problem. There are many spikes on the rear seats. Fortunately, none of them broke because there was not a good place to use a cotter pin on those. After the obligatory burlap and foam pad, I remembered to put the dry cleaner bag on the top of the foam. Then I slipped the seat upholstery over the foam and called my husband out for the fifth time. Thankfully, he doesn't
  seem to mind helping. But there were so many spikes we pulled out the gloves to do this one. After much pulling, and pushing on the springs, we managed to get everything attached to the spikes. There were a few places that I had to cut on the side to allow important hardware to poke out of the fabric. I'm not thrilled with the holes in the side of the seat, but hopefully it won't be visible when the seat is installed.
 Next I need to install the carpet on the back of the back rest for the rear seat, then I'll have the driver's side seat and the bench for the rear seat left to finish. I'll get my car back Monday, and have Wednesday off for July 4th so hopefully I can be done this week.


 You can see the old headliner on the right, the new one on the left. I'm hoping to start the carpeting today, then finish up the seat upholstery over the weekend.

 You can see the old headliner on the right, the new one on the left. I'm hoping to start the carpeting today, then finish up the seat upholstery over the weekend.