I have to relate this second hand because I didn't witness the incident. My son and husband were going to drive the Beetle to the parts store this afternoon. My husband, who is a large man, sat on the back bench seat on top of the battery. My son started driving toward the parts store. According to the son, my husband started "screaming like a girl that his butt hurt" and the car filled up with smoke. According to them, the seat pressed down onto the battery and the springs and material started burning. So I need to find out if there is a weight limit on the back seat, or if there is something I can use to protect the seat from the battery.
What great fun. Sorry I missed it.
Monday, June 25, 2007
Sunday, June 24, 2007
Ready for the Headliner

I wasn't sure we could get it done, but all of our prep work is ready and we are good to go tomorrow night to the headliner shop.
First order of business this morning was to reattach the dashboard. I had a strip of the old ugly paint on the passenger side so I used paint thinner and sand paper to get the majority of it off. Then I tried to widen the openings for the hand bar so it would fit snugly. No such luck, there is a piece of metal running through the dash that is in the way, so it's still on my to-do list. But all of the lights and knobs (except the fresh air vents) are re-attached and in place.
Once I got everything connected, I turned on the power and none of my dash lights worked. Oh was I unhappy. After tracing all of the wires, I finally realized the painter's tape was still over the fuses. When I checked, sure enough the fuse was at the end and was painted over. I replaced the fuse, and my lights came right on!
With everything restored to it's former glory, I got my new door jamb light switches and dome light and installed them. First try, I had lights. And they also work with the door switches. When you open the door the light goes on, when you close it the light goes off. Most excellent.
 Next I reattached the door hardware so I could close and latch the doors. And I had the heater vent cables (cut when my brother-in-law welded the battery pan) so I installed those. Had to make a trip to Lowes for this one. I pulled out the vent flaps, and disconnected the wires. Then discovered those wires are important, you disconnect them at the small piece of hardware that requires a VERY tiny screwdriver. I now own one of those courtesy of Lowes. Of course there are two channels, one for each side. When I first ran the wires I switched them up - one was too short and one was too long. Didn't take a braniac to figure out I had them backwards. So I pulled them out and ran them through correctly. Then I attached the vent flaps. Once again, switched them and one wire was too long the other too short. You'd think on these 50/50 situations I'd be right half the time.
Next, I installed my new wiper motor. Of course another trip to Lowes. I needed e-clips to fasten the moving arm. Removed the old motor, attached the new motor. Then installed in the car. Also attached my new wiper blades that arrived this week. The motor works great if the arms are up, but they won't move at all if the wiper blades are in contact with the window. My on-line experts think either the nuts are not tight enough or I need to lubricate the moving parts. We can try both easily.
Once I got all the parts installed, I cleaned up the floor to get all of the sanding residue up. Then we went to re-attach the clutch cable. We hate doing that, but the clutch pedal fell forward while we were painting and the cable slipped off. My son was not in a good mood when this started. So I did all the pre-work and took out the pedal assembly. Richard came out to help push the cable through so I could reattach. He was grumbling a lot, so when he asked if he could try putting the bolts in I said "no you'll get mad and throw stuff". So he left and went inside. Unfortunately I was holding the clutch, and my ratchet was in the garage. So I was stuck. He waited almost 20 minutes to come back outside - and I was hot. I was cursing like a sailor and my arm hurt like crazy from holding the clutch. He did take the clutch back and help. But not before he got mad (like I expected) and threw a wrench across the yard. Like I said, we don't like doing the clutch cable.
 Finally, all was done so we popped a seat in and took it for a drive. I drove out and my son drove home. Amazing how much he has improved since we replaced the shifter and put the shift plate in place. Being able to find the gears makes a big difference.
So Tuesday is the big day, and once the headliner is done, we'll start on carpet and upholstery.
Saturday, June 23, 2007
Paint - 2nd Attempt
 We have now painted the interior the same color we will eventually paint the exterior. I have to admit, my son was right. It looks good.
Of course our project started with a trip to Home Depot. In case I forget, Lowes is much better than Home Depot, I won't go back. My son had already called me twice on Friday to inform me there was no way we could get all of the sanding done and the car painted by Monday. So I went to Home Depot and bought a small orbital sander. What a great tool! We finished all of the sanding after I got off of work Friday. My husband and I went ahead and removed the dashboard completely. Don't be lazy when you paint, take the time up front to get as much out of the way as possible. You end up with a quicker paint job, and fewer mistakes.
 Saturday morning I got up and double checked the sanding job. Then I taped up the doors and vinyl stuff that I wanted to protect. Plastic garbage bags are great for covering the big stuff. Seems like I just did this a couple of days ago. Yup, dejavu all over again.

After it was all taped up, I sprayed another coat of primer over all the metal. Interesting, as I was sanding and priming the car again, I found whole sections that we had missed painting the first time. So I guess we're getting better as we go.

Once it was primed, we had to mix the paint. The paint was purchased from O'Reilly Auto Parts, and is a really nice metallic green/blue. We also purchased a spray kit that has a glass jar for the paint with an aerosol pump that fits on the top. It worked suprisingly well. Two parts paint to one part thinner, shake well, and spray just like a spray paint can.
 My son helped me paint this time. He said he didn't help the first time because the paint was ugly, but now that we have good paint it was worth his effort to help. I was quite thankful for his help, my index finger was still sore from the first paint job. And he has longer arms to reach under the dashboard. He only leaned up against the paint once, and that was early on in the process. He learns fast.
 I asked him to take a picture of me painting too. I think he got my best side for sure.
I was amazed that we did the entire interior with less than one pint of paint. I guess the auto paints give a much better coverage than your standard spray paint. I was impressed. It's not perfect, but come on. The car is 35 years old and looks like it. There are some rough spots, and a few where the color is slightly uneven. But overall, in my humble opinion it looks very nice, and definitely better than before we painted. And absolutely better than the first paint job.
![]() After we let the paint dry for an hour, we put four coats of clear coat over the paint. My son seemed disappointed that it didn't turn out shinier. Again, my expectations are much lower. I think it looks very nice. It's even, sort of shiny, and a very pretty color.
After we let the paint dry for an hour, we put four coats of clear coat over the paint. My son seemed disappointed that it didn't turn out shinier. Again, my expectations are much lower. I think it looks very nice. It's even, sort of shiny, and a very pretty color.
After an all-day project, we finally were able to remove the tape and painters paper and look at the finished product. Tomorrow I'll put the dashboard back in place. I can't wait until after the headliner is installed on Tuesday so we can start putting in carpet, door panels and seat upholstery.

Friday, June 22, 2007
Paint Summit
We had a bit of a family conclave last night to look at the paint. My husband evened out the paint on one of the doors so we could take a look. The paint itself actually looks good. But when we held up one of the new door panels to see how the finished door would be, it was apparent that the paint is a tan that tends toward grey, and the door panel is a lighter tan that is definitely brown. The two don't match.
No one was happier than my son, who had hounded me for an entire day that the color was awful and I was ruining my car. I guess he was right. He kindly volunteered to sand down the paint we've done, so we can paint the interior the same color that we'll use on the exterior.
My husband and son will be heading to the paint store this morning to get paint and the aerosol spray cans. I still have to be done by Monday night, so we are starting over pretty late in the game.
Thursday, June 21, 2007
Paint Failure
My son informed me that the paint I chose is "hideous". So he is going to the paint store to see if they can do paint that matches the color we will eventually use on the exterior. If he can get it, we'll be sanding like crazy tonight to get the textured paint smoothed out, and repainting the interior metal.
It's going to look awful until we can get the exterior painted, but at least yellow and blue match.
It's going to look awful until we can get the exterior painted, but at least yellow and blue match.
Wednesday, June 20, 2007
Interior Paint


I decided I needed to paint the interior metal before we installed the headliner. I am almost as bad at painting as I am at everything else. I spent hours taping and covering the interior so that I could spray paint the small bits of metal that are exposed in the interior (first picture). I dutifully sanded the metal and sprayed with a coat of primer. Then applied two coats of the stone color we picked out to go with the upholstery. It's kind of spotchy, lighter in some places than others. And the paper slipped off the corner of the dashboard, so I have a nice stone colored strip along the side of the dash. And when I was checking the underside of the dash, I knocked the door jamb with my iPod wire so I have a nick in the paint there.
I'll go get a couple more cans of paint and try to even out the finish tomorrow. I suspect it will always be splotchy, but maybe I can at least eliminate the white areas.
Maybe when I get to the seat upholstery, I'll finally find something I'm good at.
Saturday, June 16, 2007
More wiring
I have no pictures because my wonderful son took my camera to the beach this weekend. But I've been working on the dash wiring today. I now have inside turn signal lights (plus that wonderful clicking noise), headlights, and emergency flashers.
I started by looking at the relay switches and realized that the switch that controls the turn signals was supposed to have 3 connectors, but mine only had two. Off to the auto parts store I went. I bought two new relays, supposedly the only two my car requires. My reading indicated there was a place where you connect to the fuses where you can plug in the relays, and the wires attach to the underside of plug-in. However, no matter how hard I tried, I could find a position where I could actually see under the plug-in bar to make sure the wires were connected properly. Given the poor wiring on this car to this point, I decided to just unplug all the wires from the relay spot, and plug them directly into the switches.
The turn signal wires were the most difficult. The darn fool who had the car before had hooked up the turn signal wires from the fuse, to the relay, back to the fuse. Very strange - since they didn't connect to either the headlight wiring harness or the speedometer lights. Explains why my interior turn signals never worked. I pulled out my handy dandy wiring diagram and started from scratch. Once I had the right wires connected, to the right spots using the right relay, the turn signals worked just fine! Amazing. I just need to figure out a way to hold the relays in place so they don't jostle around. Possible solution may include the zip ties mentioned below.
Next I looked at the light switch, emergency flasher switch and the brake warning light. I had to remove the fresh air vents to do this - easily accomplished by removing 2 screws. I still have not figured out how to remove these switches though. The switches have small numbers printed at each connection that tell you where the wires go.
First the brake warning light. I was able to push that through the dashboard, and then pushed all the wires through the dashboard. There were no wires connected to start, so I had to connect all five. Good light and room to work, so I was able to connect all of the wires and now I have a working brake warning light.
Second I tackled the emergency flashers. It appears this switch is broken, and it was held together with a zip tie. I cut the zip tie and was able to remove the plate with the connections on it. Of course 3 of the wires were connected to the wrong place, and many wires were the wrong color. I went through my new wiring harness wires and found the correct wires for the emergency flasher connections. I connected them to the right spots on the switch, and voila I now had emergency flashers. I ran to Lowes to get more zip ties, and put the switch back together like it was originally. Sometimes you have to make due. I'd replace it, if I could ever figure out how to remove it.
Finally the light switch. With the other switches wired correctly, I re-connected the battery and crossed my fingers. The lights appear to work, so hopefully the one switch I couldn't remove, couldn't break, and couldn't see seems to be wired correctly.
Now the only things left on the dash that don't work are the windshield wipers (motor due to arrive next week) and the high-beams. My husband pointed out my left rear turn signal (outside) doesn't work, so I need to pull that apart and look at it as well.
Overall - it was a good day. And nothing caught on fire.
Saturday, June 9, 2007
Wiper Motor and Horn


I am now working on finishing up the wiring under the dashboard. The first task was to remove the wiper motor assembly, with the accompanying big metal thing that it is attached to. Removing the wiper blades is easy, and I could tell that the assembly was held on with two screws that go through the body by the windshield. We got everything removed, but the fresh air vent on the passenger side is in the way when you try to push the assembly screws through the holes and out.
At first I thought there was a nut holding the fresh air vent in place. My friend (in the second picture) climbed into the trunk and used needle nose pliers to reach one of the nuts that I couldn't get to. After much sweat and work, we removed the nut. Bad news, the nuts we worked so hard to remove hold the hand-bar in place and had nothing to do with the fresh air vents. So we went to plan B - B for Brute Force. My son came to the rescue using nothing but a rubber mallet and just forced the wiper assembly screws through and out. And tada! No more wiper assembly. Tomorrow my project will be to finish the wiring for the dash, and hopefully order a new wiper motor assembly.
Also today, I went to my favorite parts store and bought a horn. After tracing some of the wires one weekend I discovered my horn wires dangling all alone under the drivers side front fender. But too bad, so sad, there was no horn for them to connect to. I bought a horn for the low low price of $15, and installed this morning. I attached the wires, and got the connections right on the first try (an unusual event for me). And the horn is working, a very necessary feature on the car when I am driving.
My son is replacing a part that has to do with the shifter. Not sure what that part is, but he has it partially installed. Since the car must be drivable by next Sunday so I can drop it off at the headliner shop, his project tomorrow is to finish that installation.
I'm going to study my wiring diagram for tomorrow, hopefully all will go well and nothing will catch on fire.
Monday, June 4, 2007
Shout out to my best resource
I see I have missed giving the appropriate credit to my brother-in-law who showed me how to use the angle grinder, and did all of the cutting and welding on my battery pan. He has the most and the best tools, and spent a lot of time working on my car even though he had other projects he was supposed to be working on.
You can check out his blog at this link.
You can check out his blog at this link.
Sunday, June 3, 2007
Shifter and Steering Wheel

Just had a birthday, and my family bought me a new steering wheel and shifter for my bug. I installed both today.
My shifter has always been very loose. The new shifter is supposed to make the shifting pattern much tighter. It was like a miracle! When I removed the old shifter I discovered the small plate the fits under the boot was missing. When I installed the new one, it firmed up to a tight H immediately. I did read the directions and found out I needed to grease the ball at the bottom of the shifter. So, another trip too AutoZone. I now have a mini-grease gun. Way cool.
I then tackled the steering wheel. The old one was installed at an odd angle and had a very wide diameter which made it difficult for my extremely tall son to drive the car. I used the dashboard method to remove the old steering wheel. I just kept removing screws and nuts until the wheel came off. After a little reading, I also discovered you do have to pry the horn cover off before you can start unscrewing things.
The nut in the center of the steering wheel was larger than any socket I had, so another trip to AutoZone. I bought a 1 1/16 inch socket and that did the trick. Then I just followed the directions. There is a piece on the back of the old steering wheel you have to remove and reattach to the new steering wheel. This piece is related to the turn signals.
It looks great but the horn still doesn't work. When I was doing the wiring harness I was tracing wires and found two loose wires under the driver's side front fender. After checking my trusty wiring diagram I discovered they are supposed to attach to the horn. However, where the horn is supposed to be, there is nothing but an empty bracket. I see another trip to the parts store on the horizon.
Replacing the dashboard
The dashboard was an interesting project only because I don't really know how everything fits together yet. My method was simple. Remove a screw, see if the dashboard comes off, if not remove another screw. By time I was done I had removed the glove box, the speedometer, all of the knobs, and something that looks like a speaker.
I discovered my lighter was actually just the end piece filled with putty and stuck in the hole.
I bought a new dashboard from JBUGS.com out of California. Once I got the old dashboard removed, the new one slipped on quite easily. Reattached the speedometer and inserted the knobs. The screws were a challenge because you really have to stretch the dashboard tightly for the screw holes in the dash to match up with the screw holes on the body. But eventually I was able to make it work.
However, I think I didn't do the glove box area correctly. There was a flap of vinyl that overlapped the door opening at the bottom. Another trip to Lowe's this time. I bought 2 C-clamps, some super strength glue, and a paint stirring stick. I glued and clamped the flap down on the opening where the glove box door is hinged using the paint stick. I also glued the front of the ash-tray cover to the ash-tray. I think some of the glue leaked around the vinyl because now my glove box door is glued shut (with my registration inside). As long as I don't get stopped by the police I'll be okay.
Fixing the short

The short turned out to be a wire that connects the ignition coil to the choke. It took the help of several VW experts on the Air Cooled VW Club message board (Yahoo board - I highly recommend it) to help me figure out what it was.
If you can see the green wire coming out of the left side of the ignition coil, this is my very first wire that I made myself! My $289 wiring harness kit has scads of wires, but too bad for me, this wire wasn't one of them. Another trip to AutoZone. When I got there, I found wires from 10 gauge to 22 gauge, and all sizes in between. So I bought some of each, and a set of wire connectors. I had seen a mechanic make a wire, so I figured why not give it a shot. Sounds hard, but really it is a piece of cake. I matched up wires until I found the right size, cut the wire to the same length as the old wire. Then I stripped the insulation off the ends, slipped them into the connectors and crimped the middle. 15 minutes later I started the car! No smoke, no fire.
There was a mystery wire, fried to a crispy well-done, that seemed to go nowhere. It wasn't on my wiring diagram, so I just threw it away and pretended it wasn't there. Since the car is running, I guess I don't need it. If I ever find out what it does, I'll post an update.
My Son Joins the Project
My son joined the project last week. He wasn't so interested in the tedious chores like wiring or scraping tarboard. But he decided to replace the spark plugs and spark plug wires. It took three trips to the AutoZone to get a spark plug socket, spark plugs, and spark plug wires.
He removed the trunk lid for easy access, and removed the oil bath air cooler. The oil bath thing got set on my floor pans, so I had big puddles of oil all over the inside of the car.
He didn't finish the spark plugs the first day, and didn't put everything back together. The next day we got a huge rain storm, and the carburetor filled up with water.
He went ahead and finished the spark plugs, then decided to start the car to test the new plugs. There was a huge cloud of smoke, and of course I hollered to turn off the car. We decided since the trunk lid wasn't attached, and the ground wire is part of the attachment, maybe that was the problem. So we attached the trunk lid and tried to start the car again. Another huge cloud of smoke, and the car wouldn't start.
Well, the spark plugs were great, but now the car isn't drivable. Ruh roh Rorge!
I was worried one of his many lapses had caused the problem, but it was just bad timing. A wire shorted and burnt up. So that was my next project.
Main Wiring Harness


My next project was to replace the main wiring harness. I was getting mystery smoke from under the back seat. My expert at work told me it was likely a short in one of the wires, and the burning insulation on the wires causes the smoke.
For the low low price of $289 I was able to buy a complete wiring kit with diagrams for my bug. I have never done wiring in my life, and this was a scary proposition. I started with the main wiring harness. It actually isn't that hard once you get started. I carefully labeled every wire and connection as I disconnected the wires. Everything is color coded so you just match the colors on the diagram and you are set. The hardest part is pulling the old harness through the path with a string attached, then pulling the new harness back through the path using the string. You have to tape all of the loose wires together because the path is not very wide. It only took a couple of hours to complete, and the car started right up after I was done.
Fixing the floor pans


.jpg) Next on the agenda was to fix the floor pans and battery pan. It was an entire weekend of me and the putty knife. We had to pull up all of the carpet, and scrape the tar board off the floor. I learned to use an angle grinder. I also bought a Dremmel, which was great for the small areas that are hard to reach. And I am a big person working in a small car, so there were lots of places that were hard to reach.
Next on the agenda was to fix the floor pans and battery pan. It was an entire weekend of me and the putty knife. We had to pull up all of the carpet, and scrape the tar board off the floor. I learned to use an angle grinder. I also bought a Dremmel, which was great for the small areas that are hard to reach. And I am a big person working in a small car, so there were lots of places that were hard to reach. My husband swore I had to cut and weld the floor pans to patch the holes. We did cut out the battery pan and weld a new piece in place. But I got some really good advice from a Beetle Mechanic in Florida, and I used a fiberglass patch kit to cover the smaller holes. As you can see from the after pictures, the patch kit worked great on the floor pans. No more holes!
Speedometer Cable

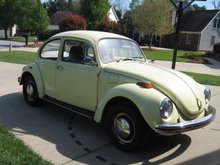
 Here is my Beetle the week we bought it. It's a little rough around the edges. Nothing on the dashboard worked. No speedometer or odometer. No dashboard lights. There was a radio, which we removed immediately due to poor wiring.
 Our first task was to replace the speedometer cable. It is supposed to be one of the easist items to fix on the car. There was no speedometer cable at all, so it took several hours to find the correct path. We could not get the cable to go through the opening in the wheel, so we stripped some of the outer protective covering off of the end of the cable. Later, we discovered that was not the thing to do. The speedometer and odometer currently work, but it is only a matter of time before it catches and breaks again. We'll repace it correctly when that happens.
My first blog entry
Six weeks ago I purchased a 1972 Super Beetle. My first car was a 1972 Beetle, and call it nostalgia but I have always wanted another one. I am a 42 year old married mother of two teenagers, and have never worked on a car before.
Needless to say it has been an adventure so far. So I decided to start a blog to document my journey.
I am without question the worst VW mechanic ever to pick up a screwdriver, but we are making progress and one day will have a drivable car.
Needless to say it has been an adventure so far. So I decided to start a blog to document my journey.
I am without question the worst VW mechanic ever to pick up a screwdriver, but we are making progress and one day will have a drivable car.
Subscribe to:
Posts (Atom)